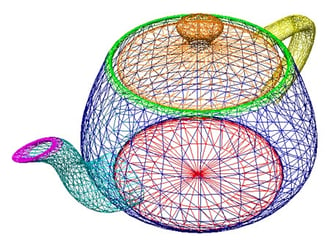
In my last post I constructed a thin walled 3D body of a teapot from surface data using surfacing operations. Whilst the code I used worked it was more complicated than I expected when I started, so I took a second look at the workflow. Once again here is the description of the input data:

| Color | Description |
|---|---|
| Blue | Sides |
| Green | Rim |
| Turquoise | Spout |
| Magenta | Tip of Spout |
| Yellow | Handle |
| Orange | Lid |
| Red | Base |
The simplification I came up with was to convert my model to 3D as early as possible, before cutting any sheets or thickening. That way I would have to do much less work myself and make use of the solid based algorithms already built into the geometry kernel.
Remaking the Teapot
Remaking the Teapot
With this in mind, the first thing to note about the surface data is that the sides of the teapot stop in a horizontal plane, top and bottom, which makes it very easy to construct a solid from them by closing the volume with planar faces.
 |
The teapot has six parts which can be made into separate solids in this way. Here shown in an exploded view are the main part of the body, the handle and the spout. Each solid was constructed by combining the surface patches then closing the volume with planar faces, a combination of two straightforward operations. Additionally the lid, the rim and the tip of the spout are converted into solids in thiis way, but are not shown for clarity. |
 |
Uniting these three solids into one is trivially easy with a geometry kernel; there are none of the issues we had with sheet bodies determining inside and outside because for solids that is unambiguous. Next it is a simple matter to shell the body to the required thickness, remembering to specify a different thickness for the faces that make up the spout. You can see the hole at the base of the spout which was created automatically by the shelling operation. |
 |
Having shelled out the main section of the pot, the solid rim is united with the body. The match between the rim and the shelled out body was very good both in position and curvature. The lid is shelled out separately, however I kept its handle solid as would be the case in a real teapot. |
Those of you familiar with the Utah teapot might know that the original data set did not have a base, which was added later and some people view it as impure. I did not use the base for two reasons; firstly the surface patches exhibit the high curvature making them harder to shell out to the required thickness, but finally it was the existence of the curvature at all; I have never seen a real teapot which has a curved base.
In conclusion
The workflow I was interested in was relatively straight-forward with what proved to be a very clean data-set. Using sheet body operations I was able to complete the workflow but there were some issues that were not immediately obvious when I started. However converting the whole problem into 3D solids as early as possible removed the ambiguities of “inside and outside” and used the geometry kernel in a more elegant way with much simpler code.


.jpg?width=450&name=Application%20Lifecycle%20Management%20(1).jpg)


